Custom Templates for Ideaflip
Create the perfect template
We are delighted to announce a significant new feature for Ideaflip: Custom Templates. This game-changing feature allows you to customise not only the Ideaflip Board but the Stationery drawer as well.
Ideaflip currently offers its users a small number of templates that can be selected when creating a new board. These provide various ready-made setups for different types of collaborative sessions.
These templates are great for setting up a board quickly, but we can’t anticipate all the ways that people want to use Ideaflip. With our new feature, you can now create bespoke templates from scratch that are precisely tailored to your work and team with a customised stationery drawer.
All users on a payment plan may create customised templates.
These custom templates can:
- be private or shared with your team
- contain all the normal Board functions and features
- customise the stationery drawer
- have customised Titles, Subtitles and Legends
- have repeating groups (e.g. swimlanes)
- even be branded with your logo
What can you do?
If you’re a consultant: you can create a set of templates unique to your clients; simplify and focus the Stationery drawer to your needs and upload a logo to create a professional look.
Are you running an event: create a set of unique templates for planning, on-the-day information and post-event feedback.
Become more efficient: turn frequently used Boards into templates that contain just the necessary stationery to get the job done.
Keeping it simple: create a minimalist Board for feedback with no complicated or confusing features and make it available publicly for quick and easy feedback.
At Ideaflip, our ethos has always been that less is more; with our new Custom Template, you can control what your users will see or not see.
How to Create Custom Templates
Set up your Custom Template
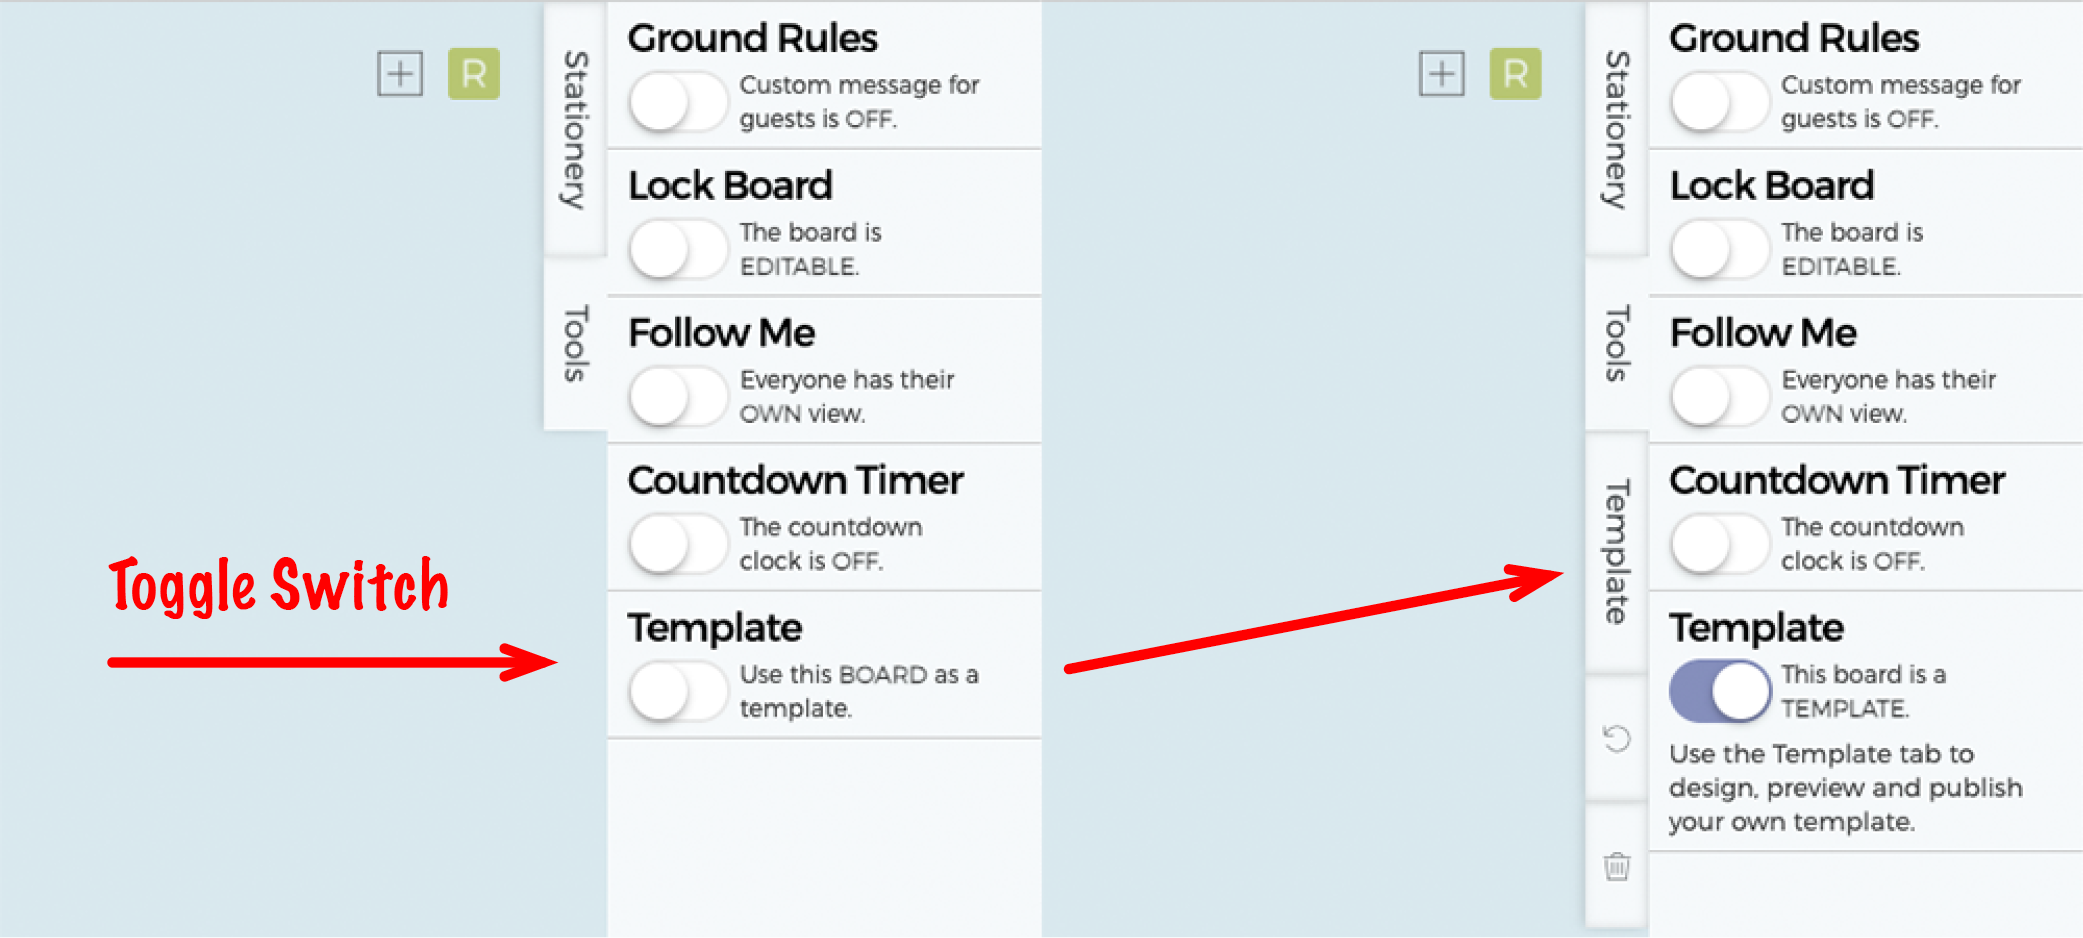
Open a new Board from the Dashboard, this will become the source for your Custom Template. In the Tools drawer there is a new Template switch that turns this board into a template; once enabled, a new Template drawer tab is available in the sidebar.
This tab has controls for:
- Settings opens template settings dialogue
- Preview opens a fake Create Board-like Preview page in a new tab
- Publish makes the template available for use by other people
- Use Now a quick way to create a board from this template
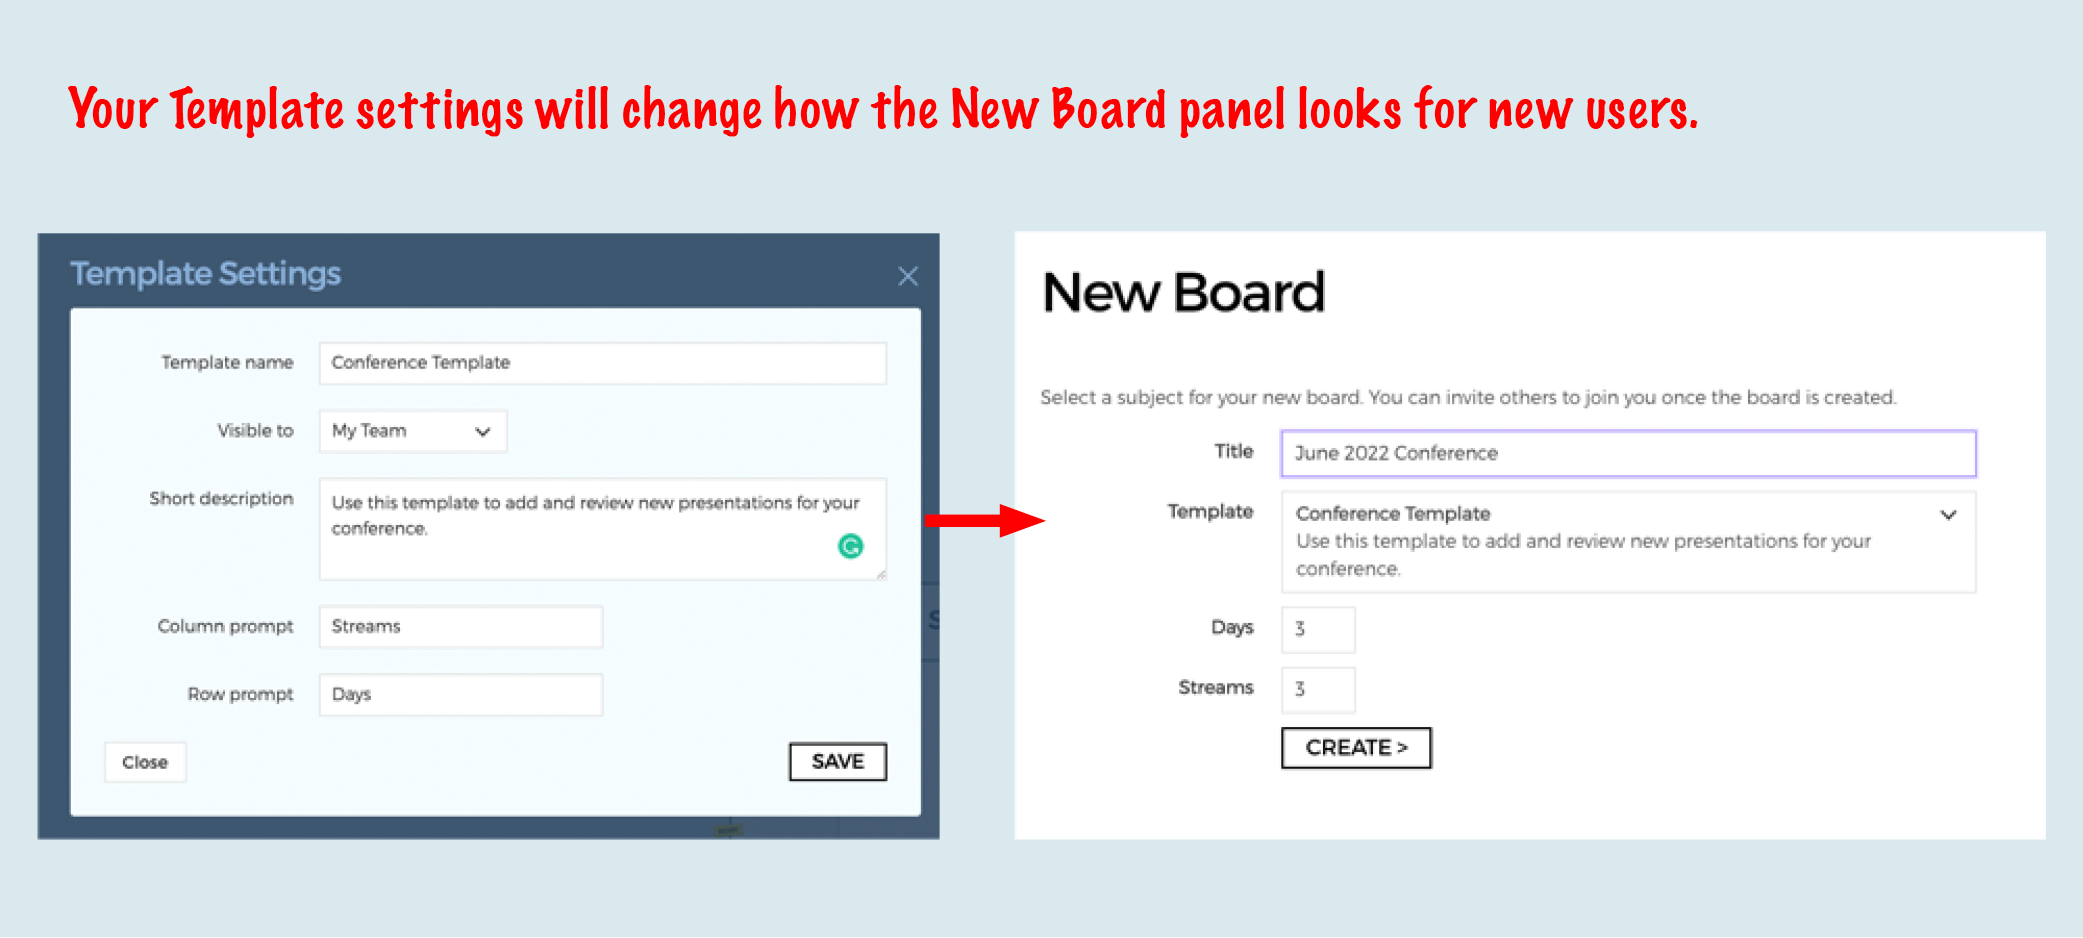
The Template Settings dialogue allows the template designer to name the template, provide a brief description and control its visibility.
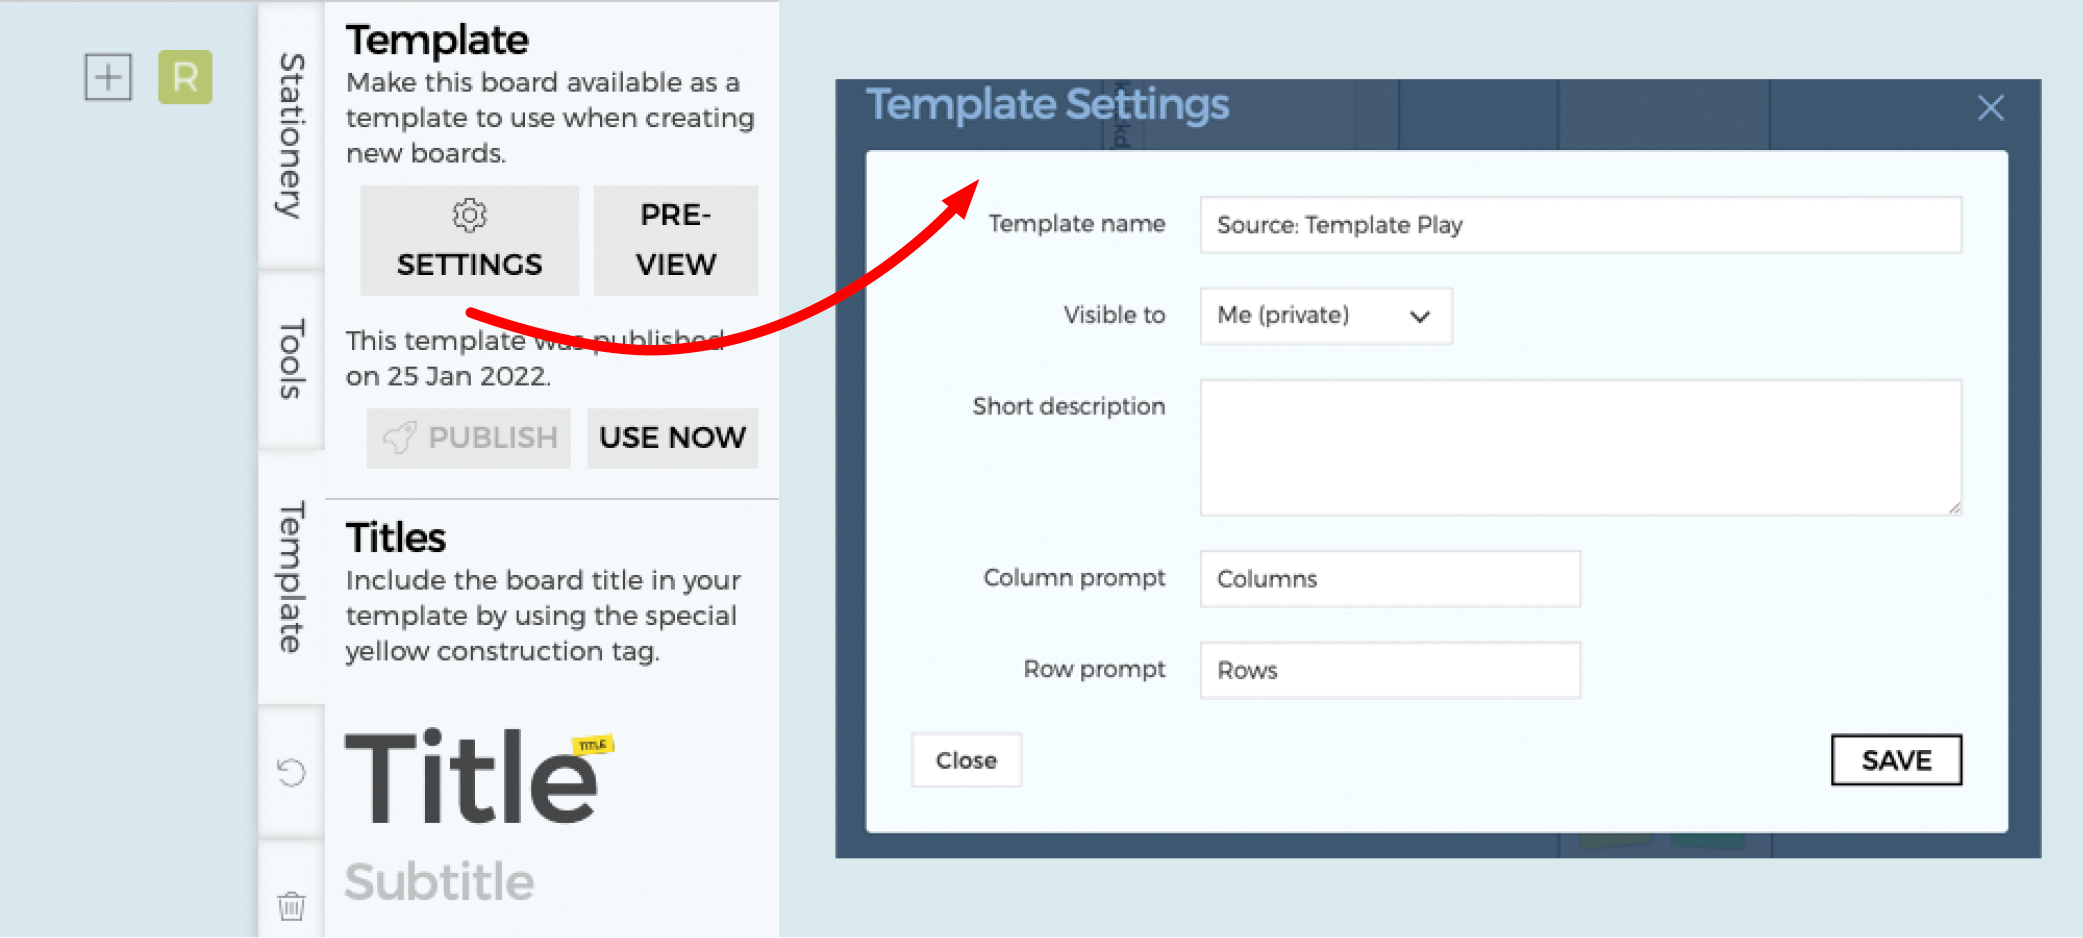
Templates can be visible to:
- Private the template will only appear for you.
- Team the template is available to all members of your team.
- Public can be shared with any Ideaflip user via a link, can also be embedded in a Public Web page (only available on the Professional plan)
There are additional settings for repeating columns and rows (see below).
Build your Custom Template
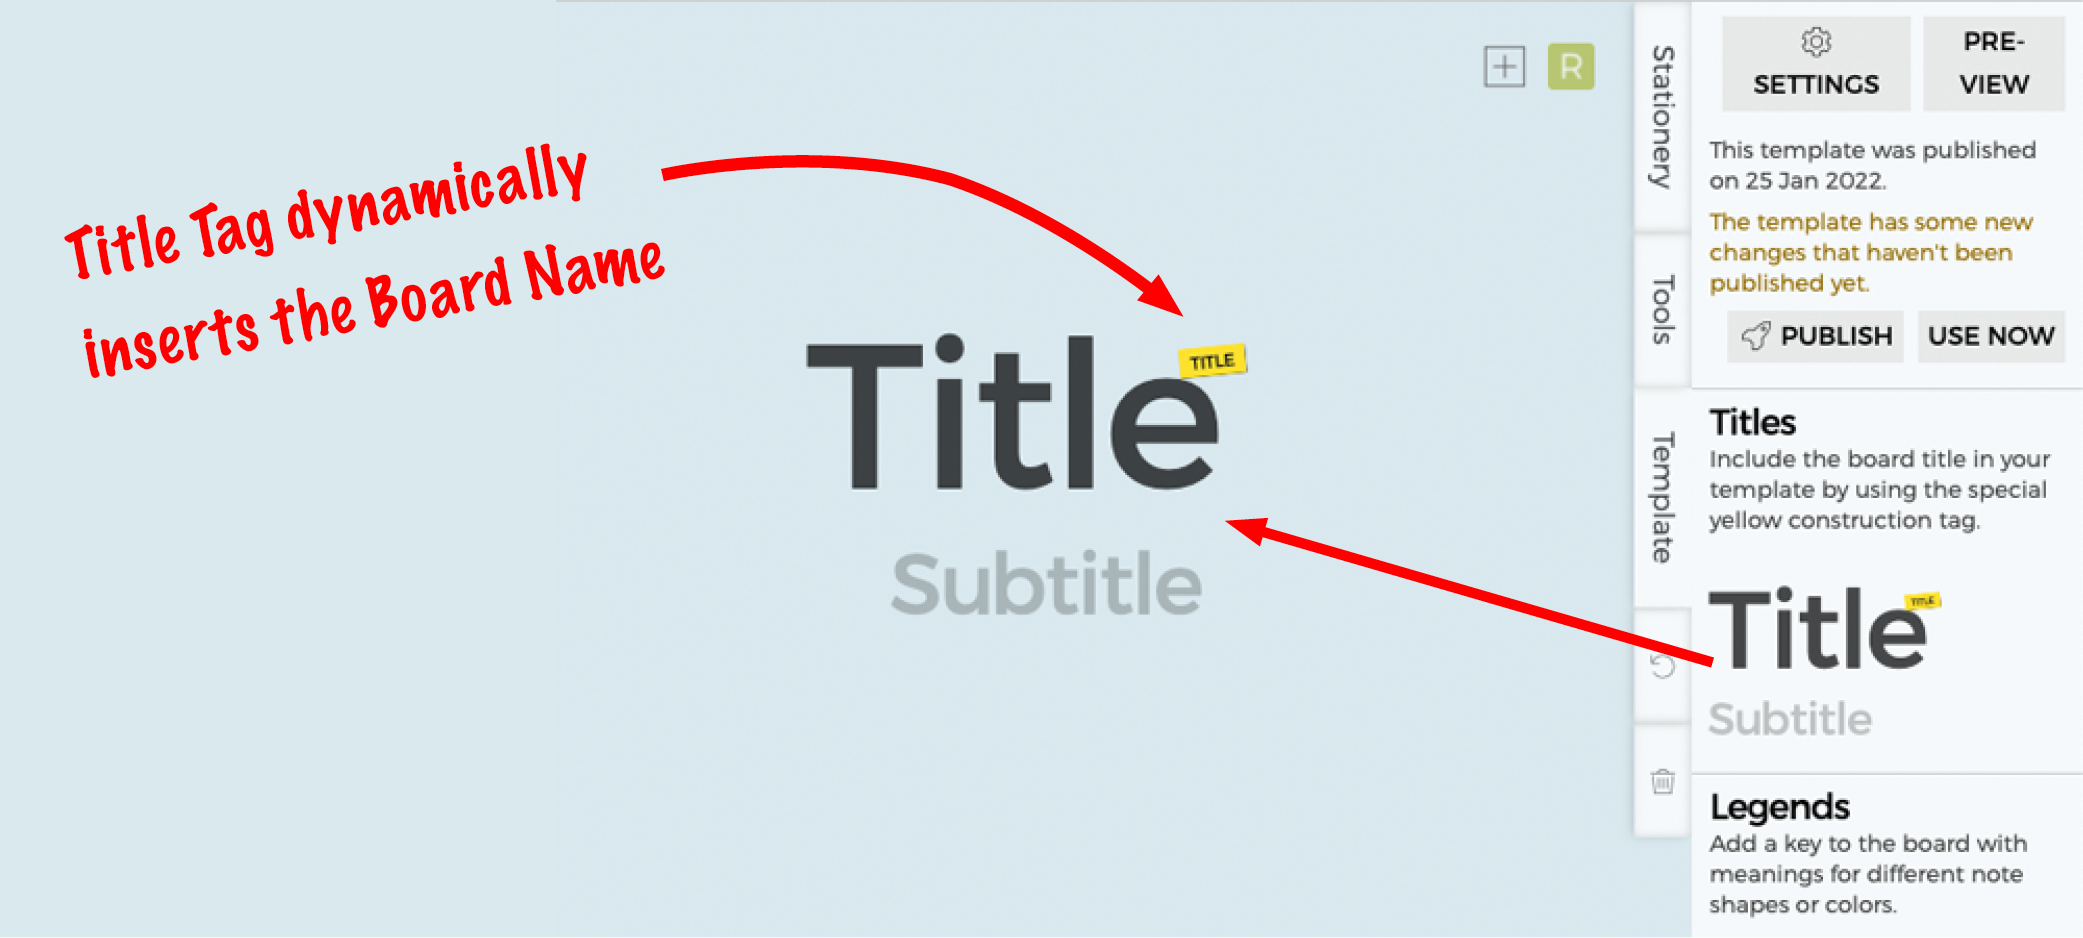
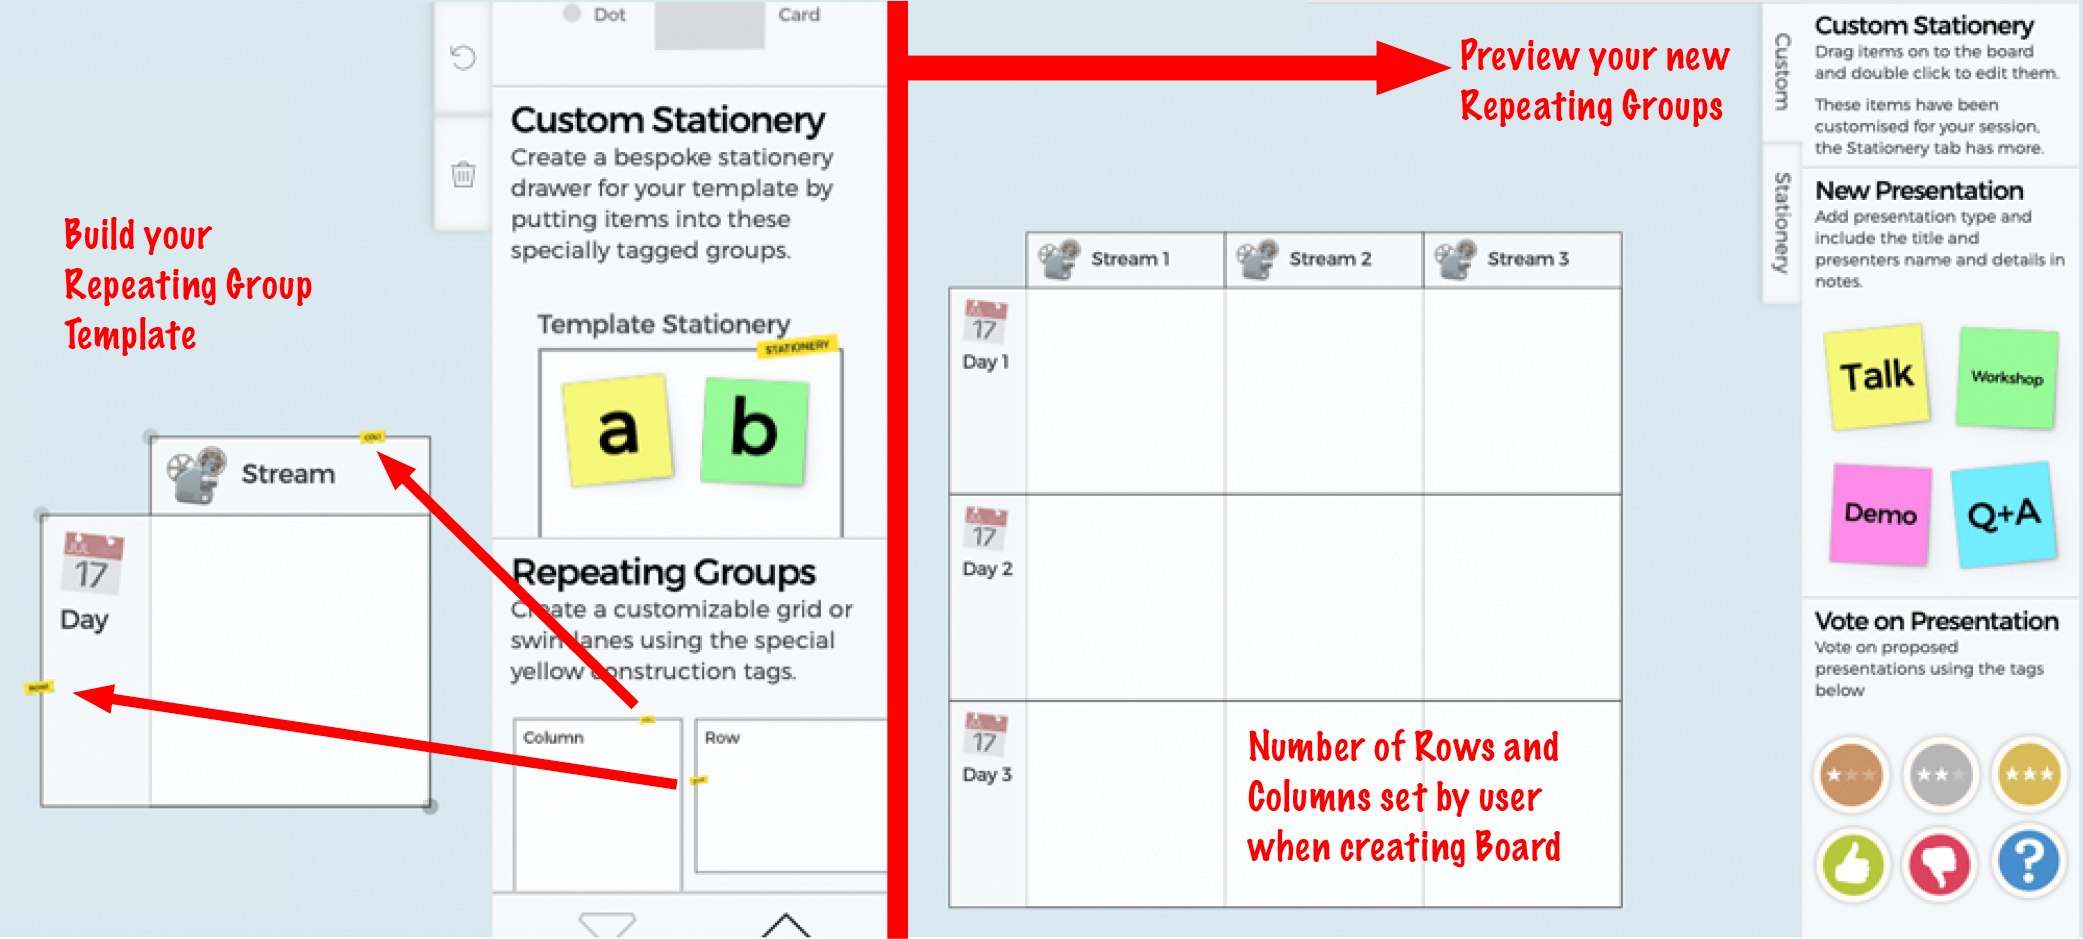
The Title with its yellow ‘construction tag’ will inject the Board’s title into the text heading when you create a new Board. Click or drag the item to the Board. The construction tag can be moved over any text item to make it a Title.
The Legend items allow template creators to create a key on the Board to communicate how they’d expect the different stationery items to be used in this template. These can be coloured to describe that, for example, ‘square green notes’ are for suggestions.
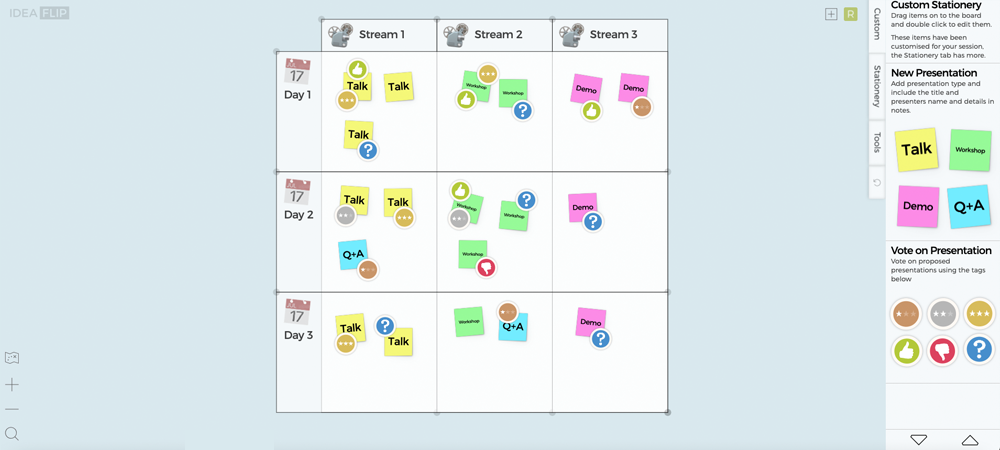
The Stationery drawer can be customised by adding or dragging the Stationery Group and its yellow construction tag onto the Board. Anything inside this Group will appear in the Custom Stationery drawer. Any Ideaflip stationery item can be placed here and will become clickable and draggable onto Boards created from this template.
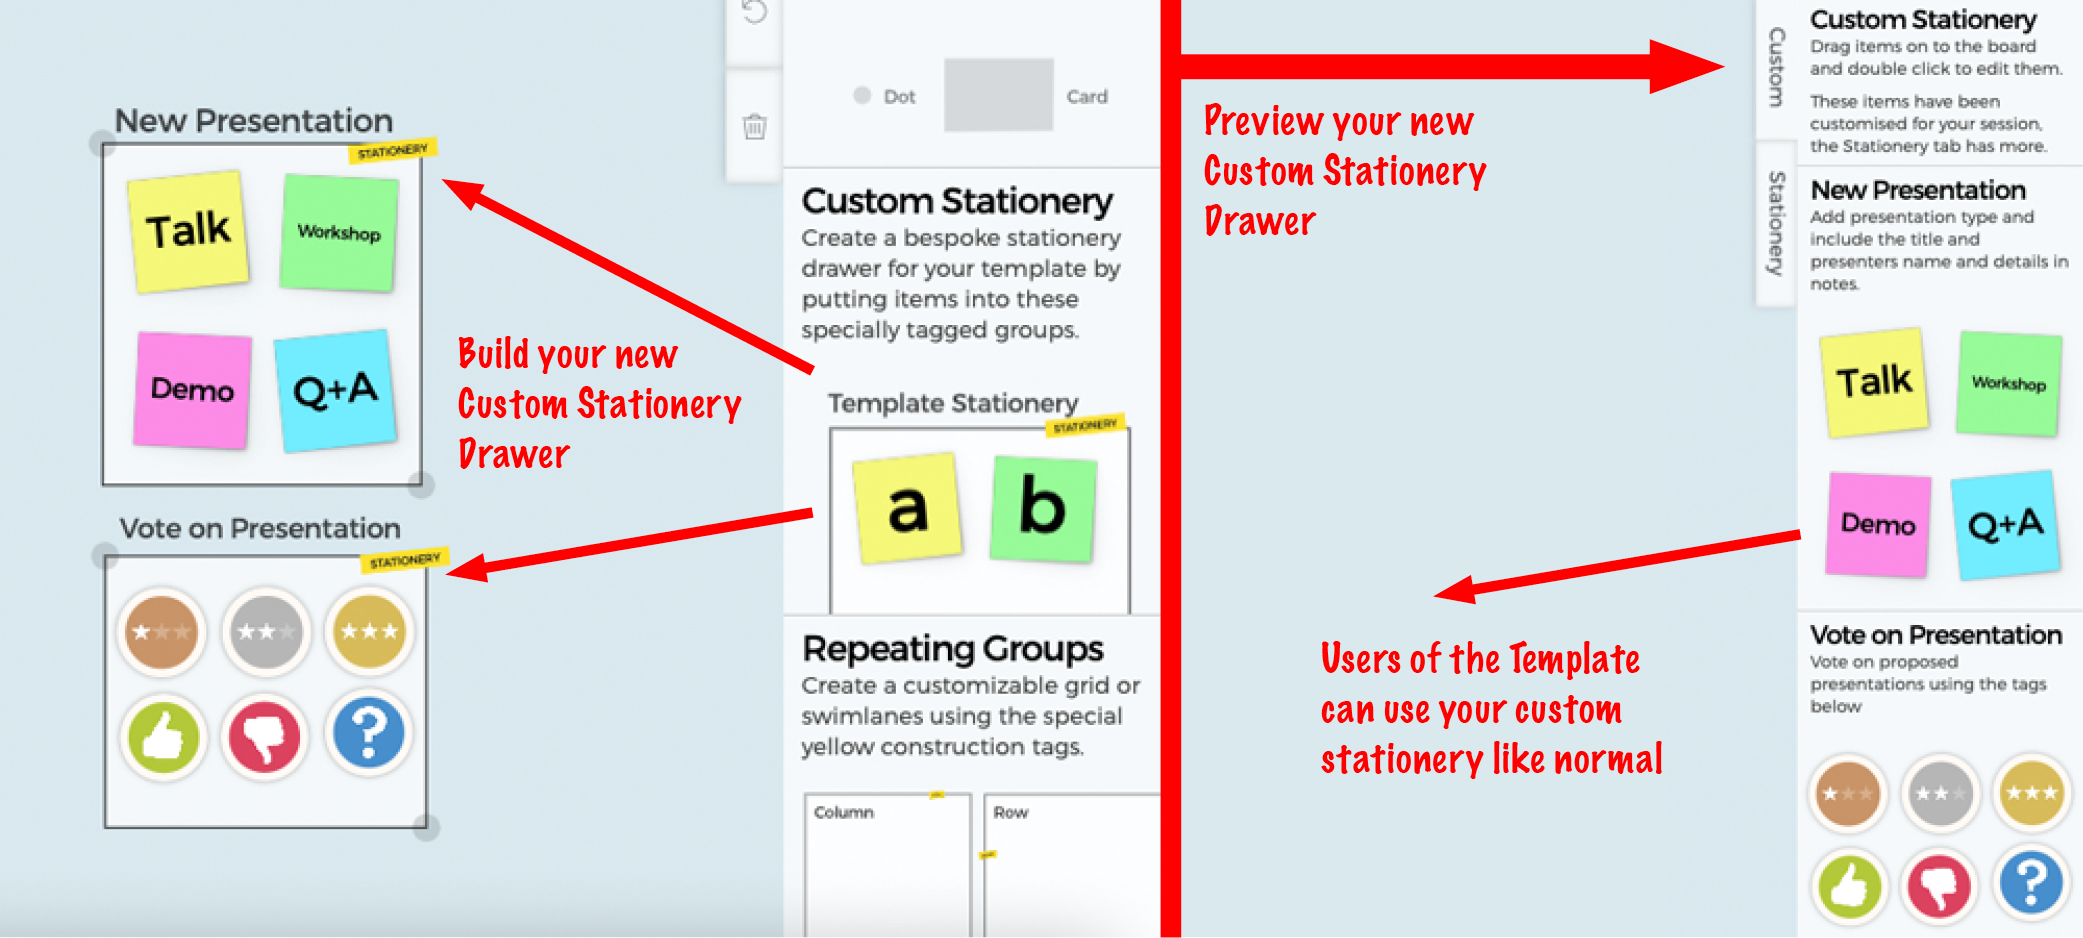
The Title of the Stationery Group can be altered to a custom Title and any notes or URLs entered in the Edit Panel will appear in the Custom Stationery drawer under the Title.
Pictures or logos can be uploaded into the Stationery Group so the Stationery drawer can be branded. Any Emoji added will also become an item that can be dragged to the Board in the Custom Stationery draw.
Repeating Groups can be added to the Board with the yellow ‘construction tags’ for COL1 and ROW1. When a new template is created in the naming dialogue panel there will be an option to set the number of rows and columns if these tags have been used. Therefore you can create the first column and row on your master template and Ideaflip will duplicate these when a new template is created based on the numbers input.
Preview your Custom Template
As you build your template you will want to preview how it will look when used. By clicking the Preview button in the Template Tab you open a new Board, give it a name, choose any columns and rows you want to test and click preview. This will create a read-only preview of what your Board will look like. As you make changes to your Template source Board, refresh your preview Board to see the changes that take place.
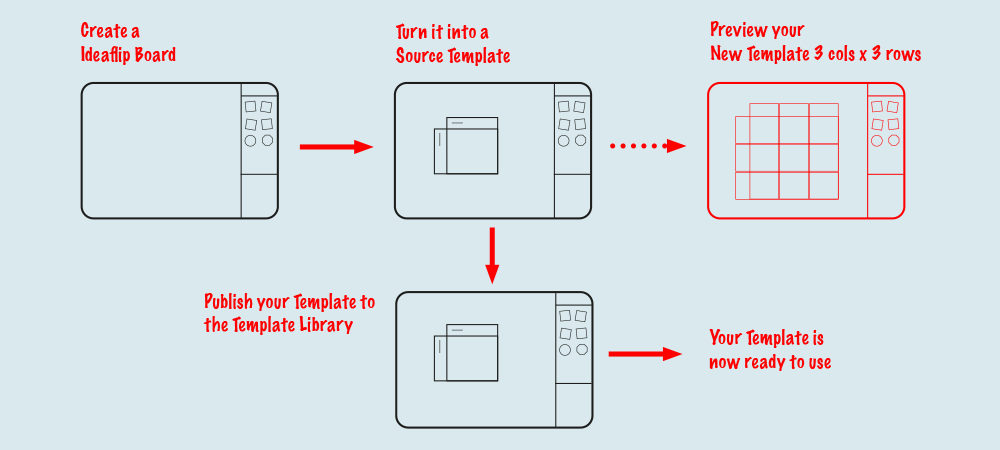
Publish your Custom Template
When all the changes have been made and the Template finished it is time to publish it so you or others can use it to create new Boards. Make sure that all the fields in the Settings panel are completed then press the Publish button. This will immediately publish the template, the button will grey and above it will say ‘This Template was published…’ and the date.
If you wish to use the new Template straight away then press the Use Now button. Otherwise, return to the Dashboard and create a new Board. When creating a new Board a list of your templates will appear in the Template drop-down as well as the standard Ideaflip templates.
Depending on whether or not you have allowed the Template to be shareable in its settings will determine whether the template appears in this list for other people in your team.
Your Template will now appear in your Dashboard with a visual indication of 3 lines next to the Title or under the preview thumbnail. If you wish to make edits to the template you can open this Board and edit the template. Please note that this will only affect new boards created from the template (and not change any existing ones).
Share your Custom Template
Once published, you can use your template to quickly create boards for online sessions that you run regularly, without needing to set it up each time. However, you can also share your templates for others to use.
Time to share with your team and guests
Let your team know that there is a new template available in their new board template dropdown. They can use and share new boards based on this template as they do with any Ideaflip Board.
If the template settings are set to Public then you can share it with guests, drop-in guests and even embed it on a website.
This could be an ideal opportunity if you have a modified version of a classic template like the Business Model Canvas. Or you could be an educator that has created a great study guide to share with the world. The opportunities are endless.
If you’ve created a great new template that you’d like to share with us, please get in touch!
 Online sticky notes to plan, organise and brainstorm with your team remotely